Several of my recent patterns have “floats.” Floats are traditionally the strands of yarn carried *behind* the fabric in knitted colourwork. The unused colour travels behind the currently worked stitches while not in use.
Sometimes floats are carried across the front of the work for a decorative effect. My Making Waves Booties have a simple, and easily memorizable, 4-row pattern with individual slipped stitches having the yarn floated in front of them.
If you tend to be a tight knitter, floating the yarn can cause your finished object to be a little snug. Sometimes this can be overcome by consciously not carrying the floats too tightly, but sometimes you need a little trick to help you out! I have a new pattern recently released: Gather Booties. This one has sets of two slipped stitches with the yarn floated in front. One of my clever test knitters came up with a brilliant solution for this potential issue: adding in a yarn over after the float:
sl2 pwise wyif, yo (up over needle to the back, then under needle back in position to purl) …. Next round, just drop that yo off the needle when you come to it.
Thanks for the brilliant and simple tip Jodi! (Find Jodi on Instagram and Ravelry)
I’m often asked why so many of my bootie patterns (and some of my sock patterns) have you knit the Outer Cuff inside out. There are several reasons …
Firstly, I’m lazy *and* I much prefer to knit instead of purl. If the majority of the Outer Cuff of a given pattern is worked in knit rounds, then I’m highly likely to have you turn the bootie or sock inside out to work the entirety of the cuff.
Secondly, because the Outer Cuff, when it’s finished, is typically turned down over the Inner (ribbed) Cuff in most of my patterns. If you work the entire Inner and Outer Cuff with the bootie or sock right side out, you’re working on the wrong side of the Outer Cuff and any colour changes are a little more awkward to achieve (at least for me they are!). Take my Fair Isle Booties pattern for example … you’d have to do all the stranded colourwork with the yarn carried in front of the work (on the purl, or wrong, side).
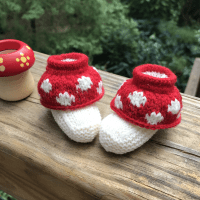
Thirdly, and this is related to my second reason, above, some of my patterns have you pick up stitches worked earlier to create extra layers or welts to create the quirky design. These would be even more awkward to work on the wrong side of the work. My Mushroom Booties pattern is a perfect example of this.
There are a couple of drawbacks to working the cuff inside out. One is that it can be hard to visualize exactly what you’re doing – ask me how many times I’ve worked something the wrong way around while designing! Another is that turning your bootie or sock inside out when it’s worked in the round means that the first round you work after turning it through is effectively worked flat; your working yarn is still attached to the last stitch of the last round which has now instantly become the first stitch of your next round. This can cause a tiny little gap which is ordinarily hidden when the Outer Cuff is completed and folded down over the Inner Cuff.
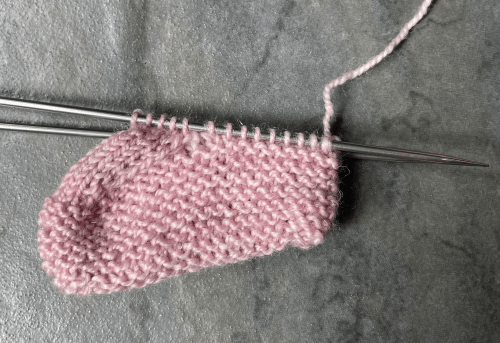
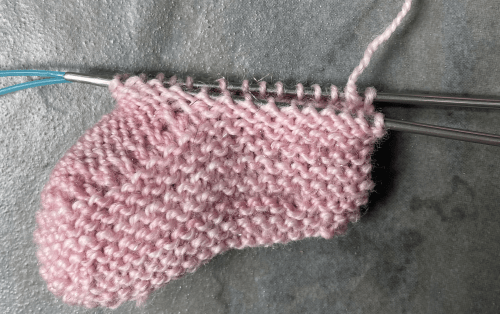
If this little gap bothers you, there’s a quick and easy trick to fix it! At the end of the final round of the Instep section, just slip and wrap the first stitch of the next round, then slip it back. Then turn your bootie or sock inside out to work the Inner and Outer Cuff sections and your tiny gap is gone! Here are a few pictures from a wip (this is my Cappuccino Booties pattern):
Instep finished, bootie is still right way out, with working yarn at the back.Slip the 1st stitch of the next round and wrap it by bringing the working yarn in front of it, then around to the back.Slip the wrapped stitch back to the front needle.Turn the bootie inside out to work the Inner Cuff. You can see the working yarn coming from where it’s been wrapped around that stitch (previously the 1st stitch of the next round, now, effectively, the last stitch of the previous round after turning the work inside out).