Several of my recent patterns have “floats.” Floats are traditionally the strands of yarn carried *behind* the fabric in knitted colourwork. The unused colour travels behind the currently worked stitches while not in use.
Sometimes floats are carried across the front of the work for a decorative effect. My Making Waves Booties have a simple, and easily memorizable, 4-row pattern with individual slipped stitches having the yarn floated in front of them.
If you tend to be a tight knitter, floating the yarn can cause your finished object to be a little snug. Sometimes this can be overcome by consciously not carrying the floats too tightly, but sometimes you need a little trick to help you out! I have a new pattern recently released: Gather Booties. This one has sets of two slipped stitches with the yarn floated in front. One of my clever test knitters came up with a brilliant solution for this potential issue: adding in a yarn over after the float:
sl2 pwise wyif, yo (up over needle to the back, then under needle back in position to purl) …. Next round, just drop that yo off the needle when you come to it.
Thanks for the brilliant and simple tip Jodi! (Find Jodi on Instagram and Ravelry)
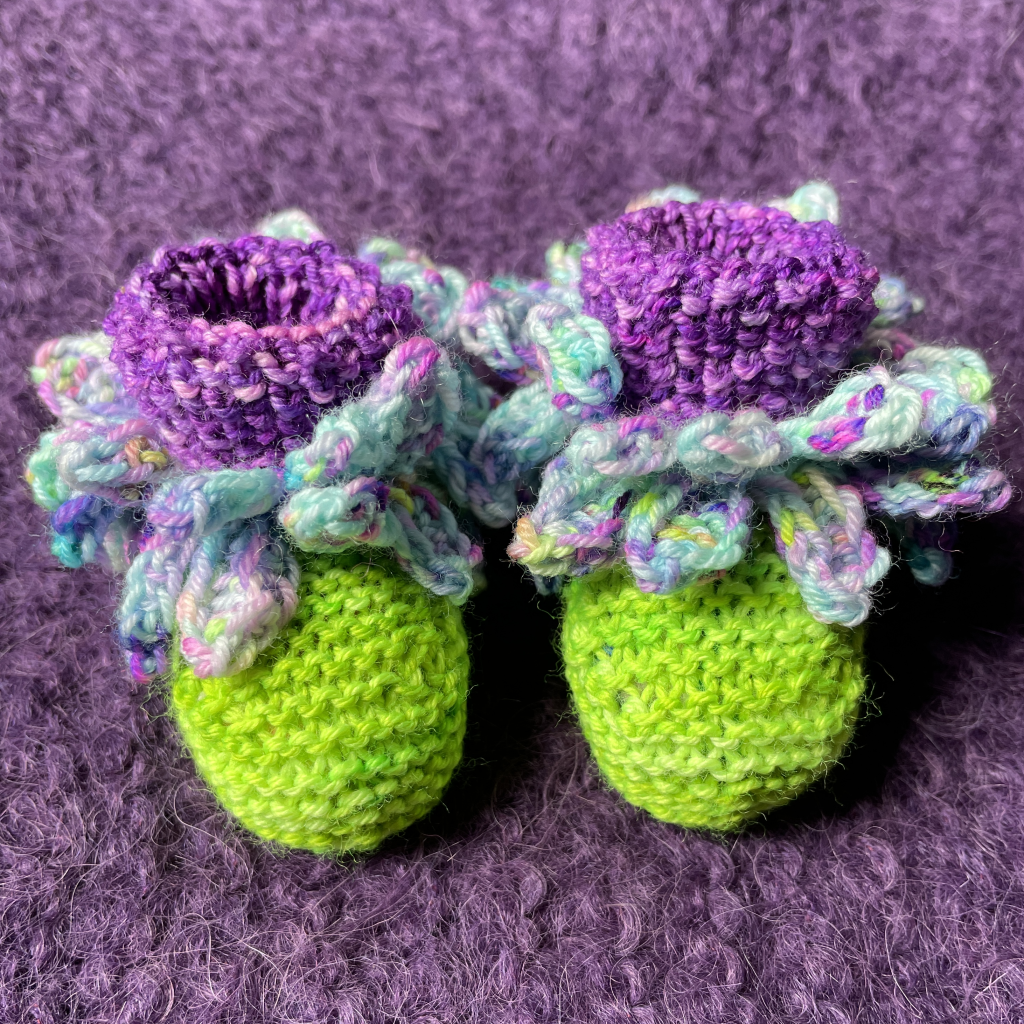
So, sometimes I design slightly wacky things. Sometimes the things I design are a bit wacky to actually knit. My Flower Shop Booties have a few *really* fiddly sections which can be a little awkward to work. Let me show you how I tackle some of these sections …
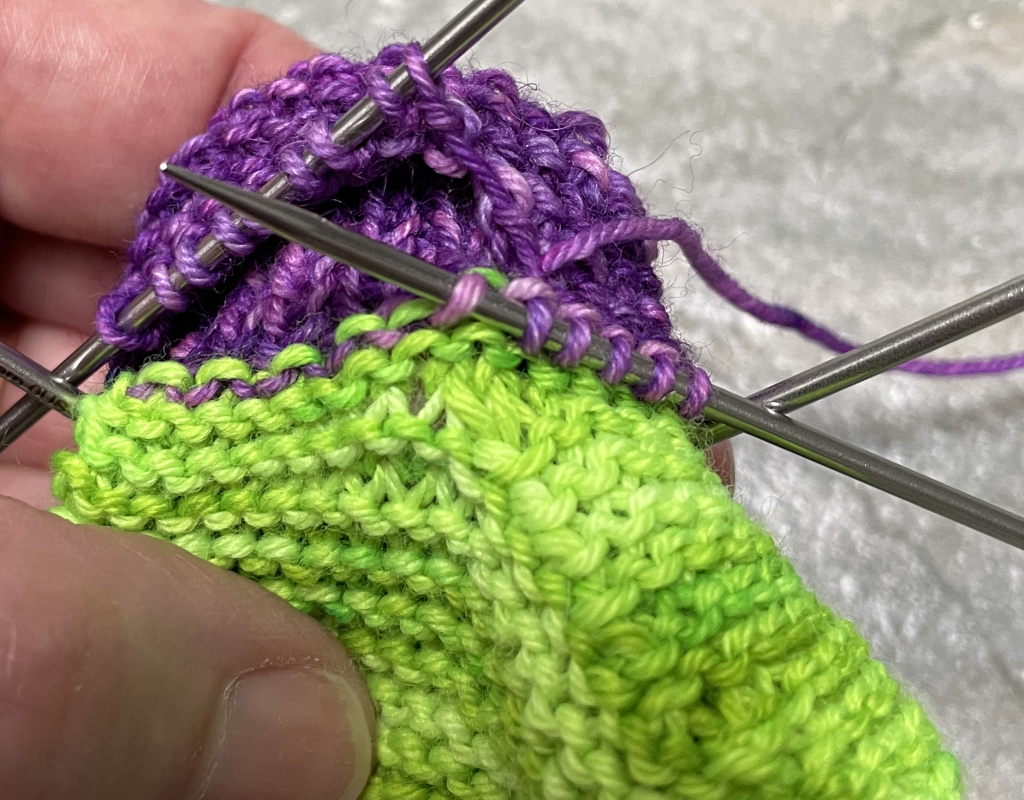
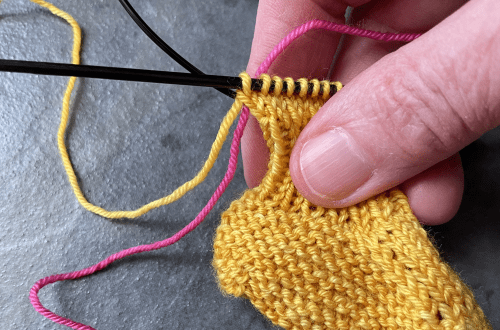
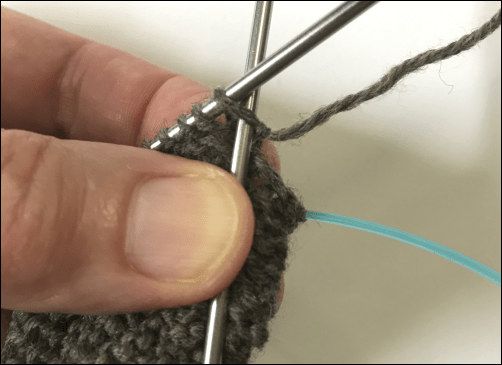
Final round of the cuff: this is where you’re attaching the top of the cuff to the base of the cuff after folding it over halfway. I strongly recommend using dpns for this section, even if you’re a diehard magic loop fan like me. Below, you can see 5 stitches already picked up on one dpn and the tip of that needle is inserted up and through the next CC1 (purple) stitch from the first (purl) round of the cuff:
I’ll then knit the next stitch on the left-hand needle (which has the remaining stitches from the final seed stitch round of the cuff), and pass the picked-up stitch over that stitch. This method joins the top of the cuff neatly to the bottom of the cuff, ready to work your Petal Base.
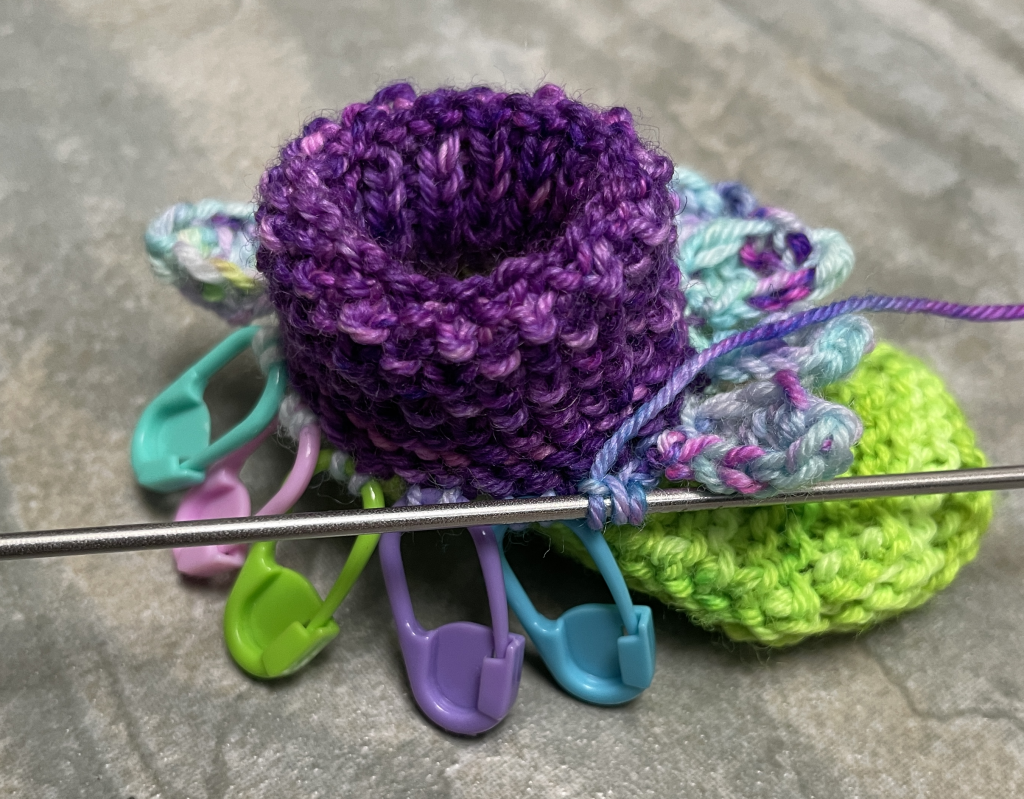
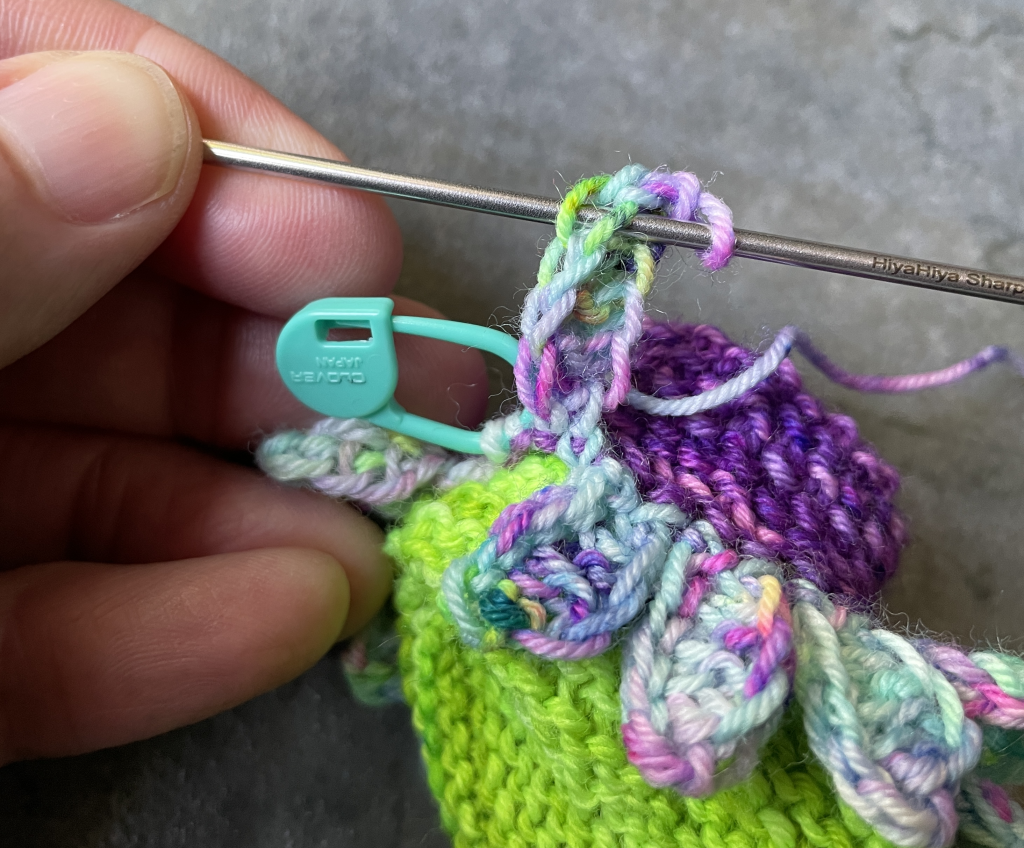
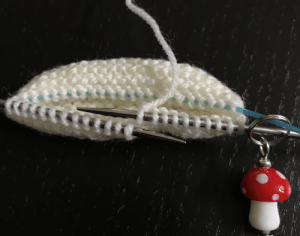
If you’re making booties with the Multi Petals, after you’ve worked the Petal Base, consider transferring your stitches, in pairs, from your needles onto lockable stitch markers. It will be much easier to wrangle each petal without dpns sticking out everywhere (and sticking into you, lol). You can just work the stitches straight off the stitch markers for each petal. I also like that I can easily see how many more petals I need to work, just by counting the remaining stitch markers. 🙂
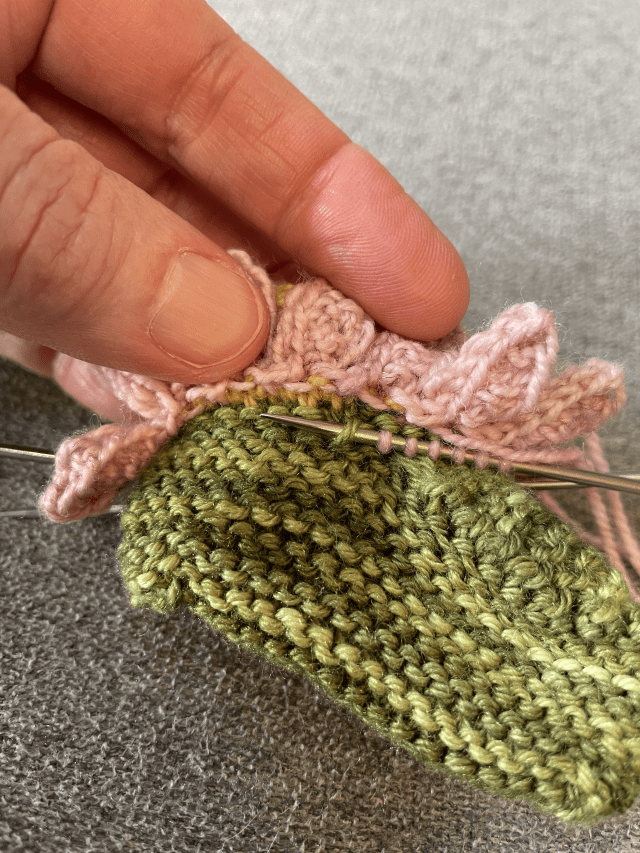
If you’ve decided to make flower booties with the Multi Petals in two layers, you’ve probably chosen the fiddliest of the bunch! When you have finished that first layer, you have to pick up stitches for the second layer. You can see, on this Star Magnolia bootie, that I’m inserting the needle up and through the next MC (green) stitch from the last round of the instep section, directly below the first layer of petals:
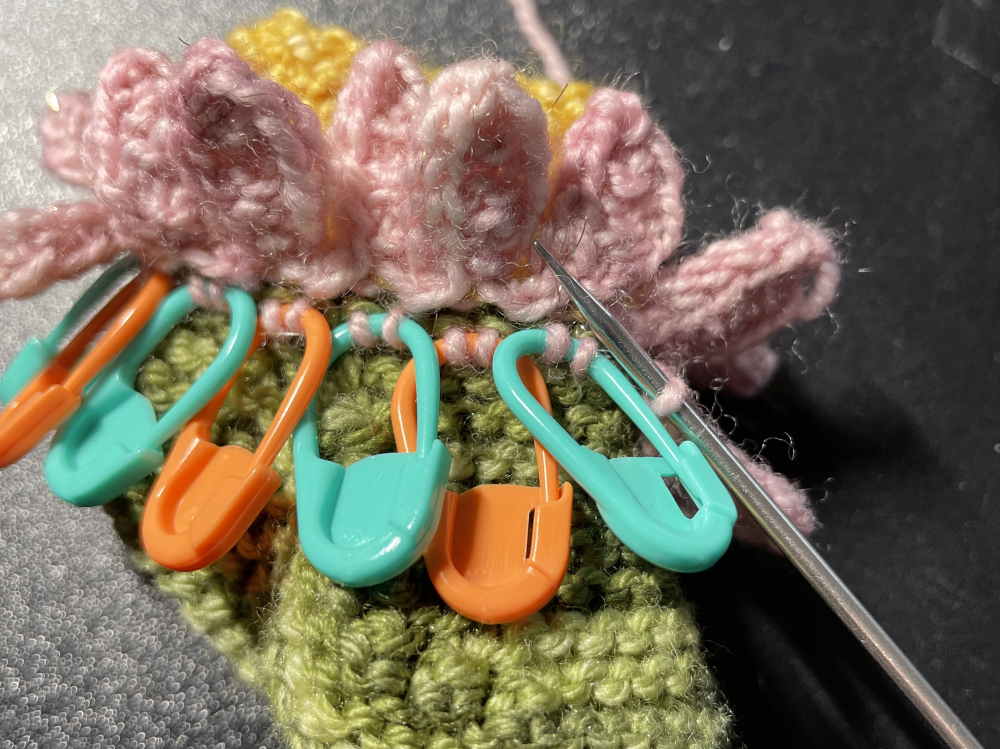
Definitely use lockable stitch markers again to wrangle your stitches, if you found that this trick worked for you on the first layer!
All the petal types use the same edging format (the sl1 pwise wyif, yb …… k1 tbl). This creates a nice line of elongated chain-like stitches along each side of the petal. When you “puk” (pick up and knit) and CO down the side of each petal, you’re picking up into these elongated stitches and creating a matching edge over the top of those. Here’s what it looks like when I have one stitch left on the needle at the top of a petal and I’m about to pick up the first stitch along the side:
I hope these tips and tricks help you make your Flower Shop Booties! Aren’t you glad you persisted?
No, not running. That’s not a thing I do. At all. If I can help it.
I’m talking about the dreaded “jog” or “stair step” when working stripes in the round. If you don’t employ any one of a number of strategies, your colour changes from one stripe to the next will look something like this:
Not too pretty is it?
This is my newest pattern design that I’m working on – Crayon Booties. Lots and lots of tiny stripes in both garter stitch (on the sides of the feet) and stockinette stitch (on the cuff). Which also means lots and lots of yarn tails – another issue, but one that can be dealt with in tandem with reducing the jog – see below!
I’ve tried many different methods for achieving jogless stripes in the round and I’ve had varying degrees of success. There’s the “knit below” method – see this video from VeryPink Knits for a great demonstration. Like many people, I really like this technique, but, as she explains, as part of the process the beginning of round (BOR) effectively shifts to the left by one stitch every time you do it. For a deep dive into jogless stripes, the TechKnitter covers the “slip the 1st stitch of the 2nd round of your new colour” method, among other tips and tricks. This technique also shifts the BOR one stitch to the left. Then there’s the “yo jogless jog” technique, which is a fairly new one to me, but it’s now the one I prefer, especially for booties where there’s a definite “center back” and I don’t want the BOR to shift between rounds. This video, from Roxanne Richardson, covers this “yo” method, as well as the “knit below” method.
What I actually do is utilize the yo method from above for reducing the jogs in combination with this technique, as demonstrated by heyBrownBerry, for “knitting in” both the beginning and ending tails of yarn (incidentally, in this video, she does the “slip stitch” method when changing colours in stripes). Anchoring the beginning tail during the last round of your “old” colour means that the yo in the “new” colour is much easier to do. Plus, you’ve already dealt with one of those pesky tails! When you are ready to start a new stripe in a repeat colour, as in my Crayon Booties, your “new” colour is already neatly anchored at the end of the previous round you worked in it. If you do both these things in tandem, you will have woven in *all* your tails and reduced the jog as you work the stripes. Win, win!
Not perfect, by any means, but much better!
It looks like I could do a little more to even out the tension when transitioning from one colour to the next (I’m looking right at you, little one-round high pink stripe in the middle!), but overall, I think it’s much improved from the green bootie pictured above. It worked surprisingly well in the garter stitch stripes on the foot.
I’ll be testing the Crayon Booties very soon, and I hope to release the pattern by the middle of May!
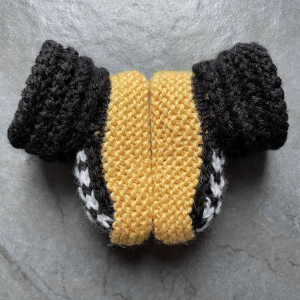
… eyestrain brought about by working 2- and 3-stitch cables on US 1 needles (2.25mm) in black fingering weight yarn. Yep, tiny, tiny, black cables on tiny, tiny needles. Am I crazy?
Well, yes, probably. But I really wanted the cuffs on my newest design, Taxi! Booties, to look like little car tires/tyres (tomayto/tomahto all over again). The only way to achieve that was by suffering for my art and working out just which little cables, in which sequence, gave me the look I wanted.
I think it was worth the eyestrain, don’t you?
The solution? An OttLite, of course! These wonderful daylight bright, adjustable lamps make all the difference when you need to *really* see what you’re doing. Mine is a floor model with dual shade and a USB charging station. I must admit, I don’t often use the charger, but the little iPad/tablet stand is handy for keeping my pattern notes. Mine looks a lot like this one:
It also doubles as an excellent reading light. I keep mine right next to a comfy Ikea Poang chair and I can plonk myself down anytime for some knitting or reading. They’re not cheap, but I think one of these is a worthwhile investment no matter what kind of crafting you do!
Taxi Booties will be published on April 22nd, 2021. Watch my social media feeds for details!
I’ve made and designed quite a few things where you work an edging sideways onto live stitches. Sometimes it’s as simple as an attached i-cord edging, other times it’s a bit more of a challenge.
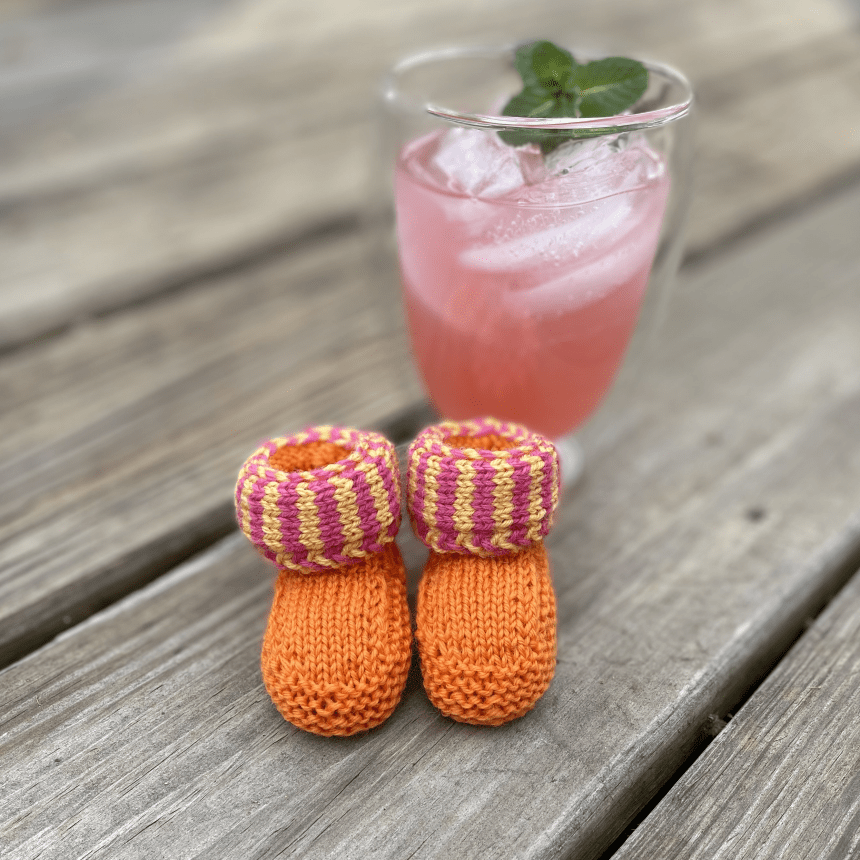
For my Sunny Day Booties pattern, I really wanted the effect of the narrow stripes of bright, contrasting colours, but I had absolutely no desire to achieve those stripes with colourwork. It seemed like it would be much easier to knit the outer cuff of the bootie sideways, joining it to the live stitches at the top of the inner cuff as it’s worked.
Of course, to finish it off neatly and (hopefully!) invisibly, grafting is required. So, that means a provisional cast-on. There are a lot of different methods of casting on provisionally, like the crochet chain method, the needle & hook method (which is really just the crochet chain method worked directly on to your knitting needle), using Judy’s Magic Cast-On (JMCO) as a provisional cast-on, the long tail provisional cast-on, and this one, which I really like for the easy way you can retrieve your provisionally cast-on stitches.
Here’s how I do it in my Sunny Day Booties pattern …
Here’s the bootie with the Inner Cuff finished in the main colour (MC: yellow). I’ll use the MC tail as my waste yarn and use it and my first contrast colour (CC1: pink) to provisionally cast on (PCO) the stitches I need for the Outer Cuff. I’ll use the last method I linked to above. I’m working the PCO onto the needle with the MC tail attached.
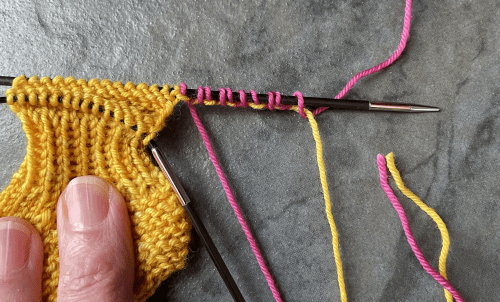
Here, I’ve completed my provisional cast-on. The MC Inner Cuff stitches are on the right and the CC1 provisional stitches are to the left of those. Don’t forget to use the MC tail as your waste yarn to save on ends to weave in! When you work this PCO, your working yarn – the one you want to continue using, in this case the CC1, will form the stitches on the needle, and your waste yarn will run neatly through the bottom of them.
I’ve turned the needle around and I have my CC1 PCO ready to work row 1 of the Outer Cuff, with the MC Inner Cuff sts also on the needle. I work my booties using the magic loop method, so you can see half the Inner cuff sts on one needle and the other half on the other (the cable is out of shot here, to the left).
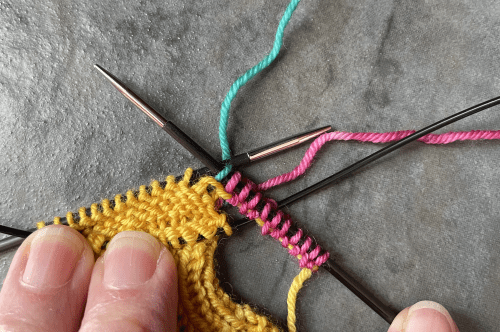
Here, I’ve worked row 1 of the Outer Cuff in CC1 and CC2 (turquoise). The Outer Cuff will be joined to the Inner Cuff by working together 1 Inner Cuff stitch and one Outer Cuff stitch in a decrease at the end of every even-numbered (right side) row. You can see the nice straight line of the MC waste yarn sitting under the CC1 PCO stitches.
When it comes time to undo your PCO, just gently ease the waste yarn out of the PCO sts. I like to use a much smaller diameter double-pointed needle to do this, then I transfer them to my working needle. You may have to realign some of the stitches as you transfer them over. Then you’re ready to graft your live stitches from the last row of the Outer Cuff together with the PCO stitches. Grafting, (commonly known as Kitchener stitch), is a method of joining two sets of stitches together so that the join is invisible (it looks just like another row of knitting). It’s most commonly used to finish the toes in socks knitted from the cuff down.
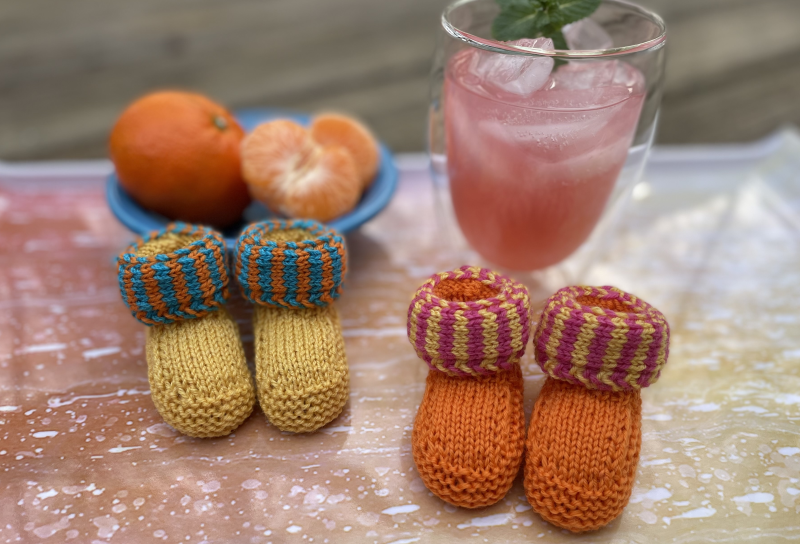
The finished booties have a nifty little striped cuff, with the stripes going sideways (perpendicular) to the rest of the bootie.
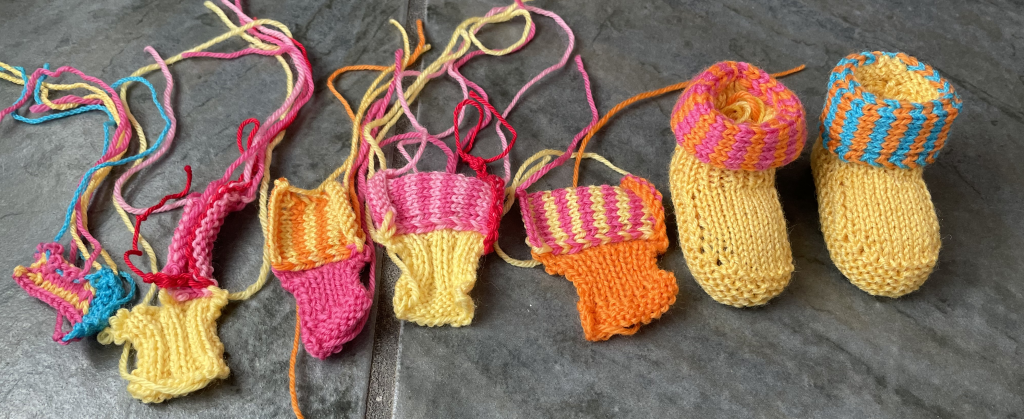
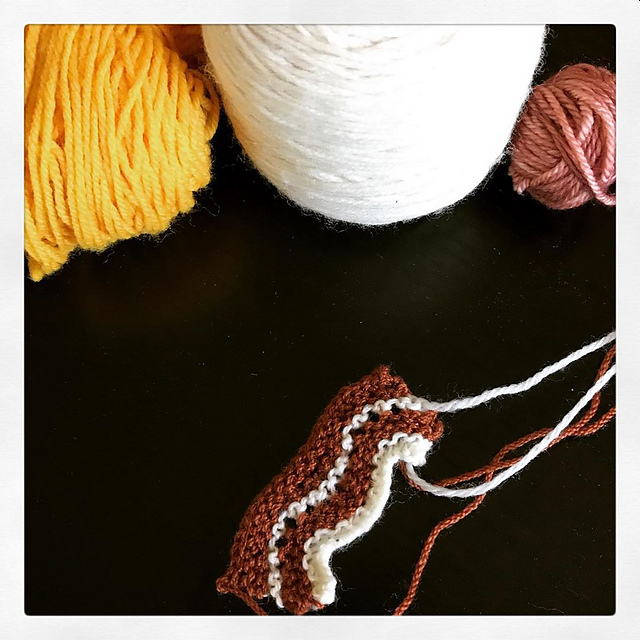
See these swatches and single mis-matched booties? They don’t look like much, do they? The good thing about designing mostly booties is that I can actually knit a whole bootie as a “swatch.” Usually, though, I start with some sketches and my coloured pencils, then I start creating tiny swatches that represent a section of the cuff (if that’s the part of the bootie that makes up a new design element). After that, I work my way up to a whole bootie.
For most patterns, even if I have a specific yarn in mind, I usually start with some kind of “workhorse” yarn from stash. I have a *lot* of Dale Baby Ull, so I often start swatching with that. Sometimes I frog my swatches to start over, sometimes I just bind them off then start the next one. I don’t really want to keep knitting, ripping back, and frogging with the yarn that I’ve bought specifically for a pattern concept, so it’s easier to use something I don’t find too “precious.” I typically make a fresh page of notes for each swatch. That way I can refer back to the earlier versions to check changes & adjustments. Most of the rest of the design process happens digitally. I use Google Sheets to track and grade bootie directions, dimensions, and sizes.
With this pattern and the first swatch, I realized that I really wanted 2-row stripes, not 4. The next few were much closer to what I had in mind, but still needed a few little tweaks. The first single bootie showed me that the i-cord edge I was using wasn’t going to work at all. The second single bootie was almost there, it just needed a tiny adjustment to the beginning and ending rows of the Outer Cuff section.
The idea for these booties came from looking at logos and colours when I was working with a graphic designer on a new logo for shake your booties! It also stemmed from feeling like a gloomy, wet winter after a *really* hard year might never end. They are a little ray of sunshine! The final booties will be knitted in three colours of Mountain Sock by Teton Yarn Company. I ordered half a dozen mini-skeins for this pattern, but, unfortunately, they are in some kind of USPS black hole somewhere between the west coast and me. 😦 If they’re not here by the end of this week, I’ll knit up a pair in the yarn I have so that I can get testing started. I want to release the pattern on March 20th, so I don’t have long.
How many times have you had someone tell you to just “trust the pattern” about a particularly tricky or counter-intuitive section of a pattern you’re making? I know I’ve struggled with quite a few patterns that other people have breezed through (I’m looking at you Hitofude, for one) because I just couldn’t visualize what was supposed to (magically?) be happening.
Several of my patterns have directions for knitting the cuff with the bootie turned inside out. This is typically because they have an outside cuff which folds over an inner, ribbed cuff, and it’s easier to knit the cuff inside out, than purl it right way out. (Unless of course, you’re someone who prefers purling to knitting!)
When you’re doing this working in the round, the first step after turning the bootie inside out can be a bit confusing – especially the first time you do it! Here’s what it looks like when I do it:
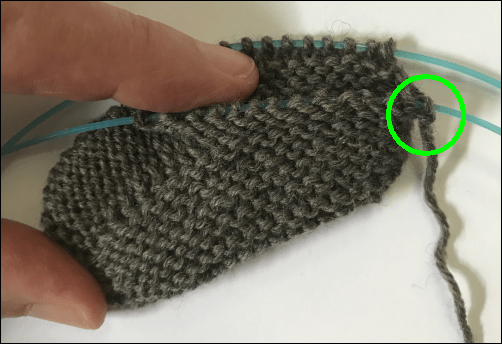
I’ve just finished the last round of the instep and my yarn is at the back needle. Ordinarily, I’d start knitting into that front needle with the yarn from the back.
The bootie is now inside out so the yarn is hanging from the front needle instead.
Now I’ll knit into those stitches on the front needle. Because the yarn is at the front, and not being carried around from the back, there will be a slight gap at the beginning of this round. It will be hidden later by the outside cuff.
I hope this helps anyone who’s stuck on this bit of any of my patterns!
On most of my recent patterns, the booties are started like a toe-up sock and knitted in the round. I knit them using the magic loop method. When you get to the instep, you’re knitting most of it flat, and it can be very awkward to do with the way the stitches are normally divided (half and half from the back & front center) in magic loop. Here’s what I do:
Work in magic loop up to the instep section, as you normally would.
Check ahead in the pattern to the last or second last round of the instep section (this will be the one that starts with “working in the round again“) and note the first direction – it will be to knit X amount of stitches before doing a k2tog.
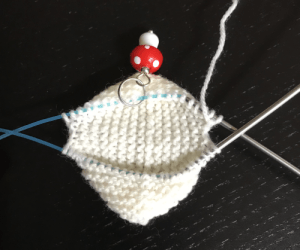
*Before* you start the first row of the instep, slide a stitch marker onto the right-hand (working) needle tip (or leave your beginning-of-round/end-of-round marker in place, if you’re using one):
Knit the number of stitches from the last row/rnd of the instep section that you noted in the second step:
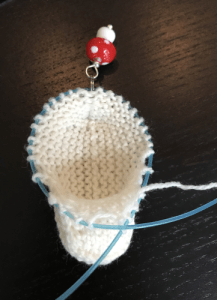
Pull first the right-hand needle tip, then the left-hand needle tip, out – all your stitches are on the cable with your marker at center back:
Count off the same number of stitches to the left of the stitch marker and pull out a section of cable – you’ve effectively re-divided your stitches with the instep stitches on one section of cable and the remainder (the back of the sole & foot) on the other section:
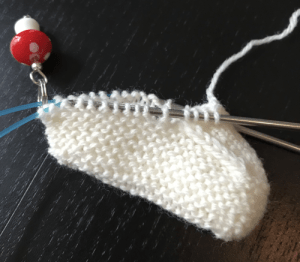
Continue with that first row of the instep and work the instep rows back and forth on these stitches up until the 3rd last row of the instep section; you’ll have 1 stitch left either side of your 8 or 10 center (usually) instep stitches on one section of cable:
Start working that 3rd last row, but stop halfway through the instep stitches and, once again, pull first the right-hand needle tip, then the left-hand needle tip, out – all your stitches are on the cable with your marker at center back:
Pull the cable out at the center back, where your marker is – you’ve re-divided your stitches back to the original half & half division:
Finish working your bootie.
I hope this helps with one of the fiddlier bits of making my booties! Let me know if you’d like to see more photo tutorials?
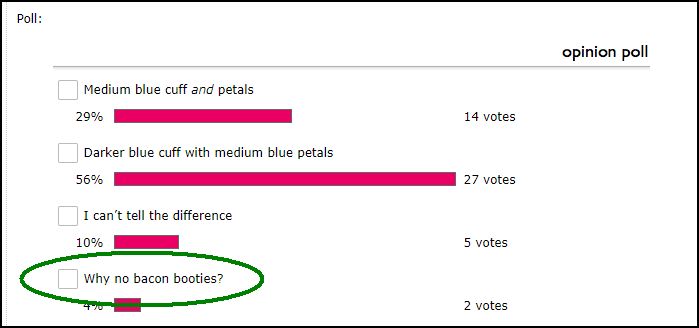
One of the groups I belong to on Ravelry (hi LSG!) has a standing tradition about bacon. If you run a poll in a discussion thread to get opinions, you pretty much *must* include a bacon-related response.
I recently sought opinions on whether my prototype Cornflower Booties (another post for another day) looked better with one cuff or another. Of course, I included a bacon option.
Challenge accepted! Bacon & Eggs Booties are currently some tiny swatches and lots of chart versions. The group responsible for my Dragon Baby! Booties has struck again. Stay tuned for an update!